Table of Contents
Managing data in Excel is crucial for maintaining accuracy, whether you’re working on a small list or a large dataset. One common issue users face is dealing with duplicate entries. Duplicates can distort data analysis, cause miscalculations, and even lead to incorrect decisions. Luckily, Excel offers several ways to remove duplicates efficiently. This blog post will guide you through the process of removing duplicates in Excel with step-by-step instructions, making it easier to keep your data clean and reliable.
Understanding the Importance of Data Accuracy in Excel
In today’s data-driven world, ensuring data accuracy is more critical than ever. According to a recent study, data duplication errors are responsible for 10–20% of a company’s data issues. Duplicates can inflate figures, alter trends, and lead to inaccurate reports, which can significantly impact decision-making processes. For example, if you’re analyzing sales data and have multiple duplicate entries for the same transaction, your revenue totals will be artificially high.
Therefore, understanding how to remove duplicates in Excel is a fundamental skill that ensures your data remains clean, precise, and ready for analysis.
How Do I Remove Duplicates in Excel: Quick Method Using the Built-in Tool
One of the easiest ways to remove duplicates in Excel is by using the built-in “Remove Duplicates” tool. This feature allows users to instantly remove repetitive data entries, ensuring that only unique records are left. Here’s how you can use this simple yet powerful feature.
Step-by-Step Guide: Using the Remove Duplicates Feature
a. Selecting the Data Range
Before you start removing duplicates, you need to select the data range where duplicates might exist. To do this, highlight the cells that you want to check for duplicates. You can do this by clicking and dragging your mouse over the data, or by using the keyboard shortcut “Ctrl + A” to select the entire dataset.
b. Navigating to the Data Tab
Once you’ve selected your data, navigate to the “Data” tab located at the top of Excel. In this tab, you will find a section labeled “Data Tools,” where the “Remove Duplicates” button is prominently displayed. Click this button to begin the process of finding and removing duplicates.
c. Choosing Which Columns to Remove Duplicates From
Excel will display a pop-up window that allows you to select which columns you want to remove duplicates from. This is particularly helpful when dealing with datasets that have multiple fields, such as customer information or product lists. For example, you may want to remove duplicates based on email addresses alone, ignoring other columns like names or addresses. Select the appropriate columns by checking the boxes and click “OK.”
d. Confirming Duplicate Removal
After selecting your columns, Excel will begin searching for duplicates in your dataset. Once the process is complete, a message box will pop up informing you how many duplicate entries were removed and how many unique records remain. For instance, if your dataset had 500 entries and 20 duplicates were removed, Excel will notify you that 480 unique entries remain.
This method is particularly efficient for handling large datasets with multiple fields and helps in reducing human error while manually removing duplicates.
Alternative Method: Removing Duplicates Using Conditional Formatting
If you’re not ready to remove duplicates but want to identify them first, using Conditional Formatting is a great option. This method visually highlights duplicates, making it easy for users to review them before deciding whether to delete them or not.
How to Highlight Duplicates with Conditional Formatting
a. Select the Data Range
First, highlight the cells or columns you want to check for duplicates. This is done the same way as in the previous method by clicking and dragging or using the “Ctrl + A” keyboard shortcut.
b. Open Conditional Formatting
Go to the “Home” tab in Excel and look for the “Styles” group. Within this group, you’ll find the “Conditional Formatting” option. Click on it and navigate to “Highlight Cells Rules,” then select “Duplicate Values.”
c. Review Highlighted Duplicates
Once you select “Duplicate Values,” Excel will highlight all duplicate entries in your dataset. You can choose how duplicates are highlighted by selecting different formatting options, such as color fill or bold text. Now, you can manually review the duplicates before deciding if they need to be removed.
Conditional formatting is a useful method when you want to double-check your data visually before taking any action. It ensures that no crucial information is accidentally deleted.
Advanced Method: Using Excel Formulas to Find and Remove Duplicates
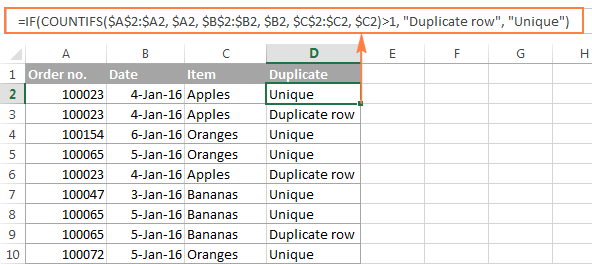
For more advanced Excel users, formulas can be a powerful tool to identify and remove duplicates, especially in complex datasets. One of the most commonly used formulas for finding duplicates is COUNTIF.
How to Use COUNTIF to Identify Duplicates
a. Write the COUNTIF Formula
In a blank cell next to your dataset, enter the formula =COUNTIF(A:A, A2). This formula checks how many times the value in cell A2 appears in the entire column A.
b. Filter and Sort Duplicates
After applying the formula, Excel will return a number indicating how many times that value appears in the selected range. If the value is greater than 1, it means that the entry is duplicated. You can then filter or sort the column to isolate and remove duplicate entries manually.
While this method is more hands-on, it provides an additional layer of control for users who need precise management of their data.
Best Practices for Managing Duplicates in Large Datasets
When managing large datasets, it’s essential to maintain best practices for preventing and addressing duplicates. Here are a few tips:
- Regularly Clean Data: Set up a routine to remove duplicates every month or quarter, depending on the volume of data you’re handling.
- Use Excel Tables: Convert your data into tables to make sorting and filtering easier, which helps prevent accidental duplication during data entry.
- Prevention Through Data Validation: Use Excel’s “Data Validation” feature to restrict duplicate entries at the point of data input. This ensures that you won’t have to deal with duplicates later on.
- Backup Your Data: Always create a backup of your dataset before removing duplicates. This helps you recover any essential data that may be deleted in error.
In large datasets, removing duplicates can significantly reduce data errors and improve the reliability of your reports. For example, a marketing team handling a customer database of 10,000 contacts could reduce data inconsistencies by as much as 15% by regularly removing duplicates.


